Tuesday, March 9, 2010

lipstick and lip gloss

How to apply lipstick and lip gloss

Making up our lips as africans is a tricky venture I must say, listed below are some of the reasons


  1. we have fuller lips

  2. Our lips are naturally lined in most cases with two toned the centre usually lighter.

  3. it comes with irregular shape

How to enhance your lips


    • you can simply apply a clear gloss over the entire lip

    • Use a skin coloured lip pencil i.e. brown pencil to line your lips, use this same pencil to fill the lip add a clear lip gloss or in this case as I did below use a clear golden shimmer lip gloss.

    • Instead of the normal brown lip pencil you can use coloured pencil or lip sticks to line your lips. Colours such as wine, plum, dark raspberry, black velvet. generally line your lips with darker colour and use a brighter colour in the centre.

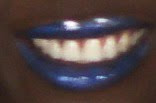
    • Full lip single colour, like I used red and later blue below.

Saturday, March 6, 2010

saturday turned out well after all


It’s Saturday and I am not doing make-up as in (no bridal, chief brides maid, the bridal train notin whatsoever), so when my mum suggested that she wants me to make her for our neighbours wedding I was ecstatic any makeup is good even if I don’t get paid . as in, am that crazy about makeup.
She’s wearing d traditional iro and buba, the gele is orange coloured, she is in her mid fifties, so I have my brief.
Try to make her beautiful in a mature, understated way. Not like this

This was my bride for last week kike,her colour was also orange but she combined it green.

My mum before, notice the under eye circle, uneven skin tone and scanty eyebrow

After I applied concealer for her under eye area, foundation to even the skin tone, powder give a matte and filled her eyebrow.

Finished look.
I believe that I have achieved my objective, beautiful yet understated very mature.

Product used –mac concealer (Nw 50)
Black opal flawless foundation (ebony black)
Tint powder (N10)
Marykay eye shadow (goldenrod, canberry)
Black opal lip gloss
All this products are available at reasonable prices just call to place your order

Thursday, March 4, 2010

makeup for a photoshoot


from non conventional to crazy makeup


Its been a very dull day and since I hate being less busy –an idle mind is the devils workshop- I called in my neighbour as a model. wit the intention of playing with my hand.

And so the makeup practical starts.


Here is her face before (my blank canvas)


i trimmed both eyebrows and i have applied Foundation and powder on her face (mary kay foundation 607 and black opal medium 03 loose powder)


Then the colours begin, yellow eye shadow (dis not ur conventional makeup colour but as can see its great i.e. if u feel like making noise)

Then I added deep blue, giving a catty winged look (dat is when we cross d over from non-conventional to slight craze)

Am sure u will feel its time to stop but not me, I added silver. At this point my model was murmuring (aunty tope isn’t this too much)

So what do u think is it a crime to express myself, cant blame me for going overboard I was trying to work boredom out of my system

Tuesday, March 2, 2010

mascara


Mascara is a cosmetic used to darken, lighten, colour, thicken, lengthen, or define eyelashes. Mascara comes in three forms: liquid, cake, and cream. It also comes in many formulas, tints, and colours. Mascara is available in tubes with wand applicators


Tips for Applying Mascara


Applying mascara is certainly not the easiest thing in the world. From smearing globs of mascara on your carefully-shaded eyelids, to stabbing yourself in the eye with the brush, there are plenty of things that can go wrong for the novice mascara user. Despite these potential obstacles, applying mascara is a relatively straightforward process. Once you get the hang of it, it is easier to avoid common mistakes, and clean up the mess more easily on those occasions when it is necessary.


How to Apply Mascara

These simple steps will help you apply mascara correctly.


Step One: Apply mascara after applying the rest of your eye make-up. Always make sure your lashes are clean and dry before you start applying mascara.

Step Two: Start the application process by curling your lashes. Buying an eyelash curler is definitely a great investment! An eyelash curler can do wonders for the mascara application process. Be sure to always curl before applying mascara, as trying to curl your lashes when they are coated promotes clumping and breaking
To curl your lashes, place the mouthpiece of the curler over your lashes then squeeze the handles together for a count of five.

Step Three: Moving from the inside of your eye to the outside, stroke the mascara wand gently over your upper lashes. Reduce clumping by wiggling the wand slightly as you brush it along the length of your lashes. The wiggling motion not only helps separate your lashes and reduce clumping, it also helps to give your lashes a little more length.

Step Four: Use an eyelash comb to separate your lashes if necessary. This should be done before the lashes have dried.

Step Five: Repeat steps three and four, if you want to apply a second coat. Try applying a second coat over the entire lash length, or over the tips only, to see which works best for you.

* Try some variations from your basic black and brown. Colored mascara is back, and the new season’s shades look stunning.
Mint Green, turquoise blue, deep blue, deep green

Monday, February 22, 2010

body scrub 2


Epsom Salt Body Scrub

With the creation of new medicines, treatments, tonics, rubs, sprays, soaks and other aids, many people have lost sight of the fact that before all of the fancier products came along, the old-fashioned products did the trick for most people. The newer products might come in fancier packages, have added aromas or come with sparkles and colors, but stripping all of that away, you end up with the underlying ingredient which is the one that works.
Today I will share with u advantages of Epsom salt.

Epsom Salt
Epson Salt is magnesium sulfate. It offers one of the most effective means of getting the magnesium your body needs readily available

10 Wonderful Ways to Use Epsom Salt


  1. Relaxing and sedative bath: Soak in warm water and 2 cups of Epsom salt.

  2. Foot soak: Soothe aches, remove odors and soften rough skin with a foot soak. Add 1/2 cup of Epsom salt to a large pan of warm water. Soak feet for as long as it feels right. Rinse and dry.

  3. Soak sprains and bruises: Epsom salt will reduce the swelling of sprains and bruises. Add 2 cups epsom salt to a warm bath, and soak.

  4. Splinter remover: Soak in epsom salt, it will draw out the splinter.

  5. Face cleaner: To clean your face at night, mix a half-teaspoon of epsom salt with your regular cleansing cream. Just massage into skin and rinse with cold water.

  6. Homemade skin mask: Apply the mask to damp skin. For normal to oily skin, mix 1 tablespoon of cognac, 1 egg, 1/4 cup of non-fat dry milk, the juice of 1 lemon, and a half-teaspoon of epsom salt. For normal to dry skin, mix 1/4 cup of grated carrot, 1 1/2 teaspoons of mayonnaise and a half-teaspoon of epsom salt.

  7. Skin exfoliator: Massage handfuls of epsom salt over your wet skin, starting with your feet and continuing up towards the face. Have a bath to rinse.

  8. Remove excess oil from hair: Epsom salt soaks up excess oil from hair. Add 9 tablespoons of epsom salt to 1/2 cup of oily hair shampoo. Apply one tablespoon of the liquid to your hair when it is dry; rinse with cold water. Pour lemon juice or organic apple cider vinegar through the hair, leave on for 5-10 minutes, and then rinse.

  9. Remove hairspray: Combine 1 gallon of water, 1 cup of lemon juice, and 1 cup epsom salt. Combine, cover and let set for 24 hours. The next day, pour the mixture into your dry hair and let it sit for 20 minutes. Then shampoo as normal.

  10. Hair volumizer: Combine equal parts of deep conditioner and epsom salt. Warm in a pan. Work the warm mixture through your hair and leave on for 20 minutes. Rinse.

    Cautions:The use of Epsom salt baths is not recommended without the consultation of your health care provider. Hypermagnesemia is a condition of excess magnesium that may be fatal. Epsom salts should not be used if you have an allergy to sulfur or if you are pregnant.


http://www.epsomsaltcouncil.org/about_science_of_epsom_salt.htm


http://www.natural-homeremedies.org/blog/health-benefits-of-epsom-salt/

Tuesday, February 16, 2010

body scrub


Coffee body scrub
The coffee we all love so much has many uses beyond just waking us up in the morning. One of those uses is to create a coffee body scrub.
Advantages of coffee body scrub.
This information was provided by CancerLynx
1. No more cellulite. While coffee is wonderful for many reasons, it is actually the caffeine it contains that provides the added health benefits as a scrub. When coffee is applied to the surface of your skin, it helps redistribute fat cells and decrease the formation of cellulite.
2. Reduces varicose veins. Many people accept varicose veins as a necessary evil. Now with a coffee body scrub, you may be able to prevent varicose veins or even make them vanish! The caffeine in a coffee scrub acts as a vascular restrictor--shrinking blood vessels, thus helping to reduce varicose veins.


The recipe for a coffee scrub (includes only three main ingredients)
  1. 2 cups of coffee grounds (Brand does not matter--the cheaper the better.
  2. 1/2 cup raw sugar or sea salt
  3. 2/3 tablespoon of massage oil (Any plain, cheap massage oil will do.)
Simply mix these three items together in a bowl, thats all!

When it comes to making a coffee body scrub, you also have a few add-in options:
  • Brown sugar - Brown sugar adds a sweet smell, as well as a coarse texture that helps to rejuvenate your skin. Add until you reach the texture desired.

  • A dash of cinnamon - Adding cinnamon will give your scrub a stronger sharper scent.

  • Vanilla extract - Vanilla extract gives your coffee scrub a sweeter smell. It also thins the scrub out a bit, if that is the texture you are going for. It may also make the scrub more soothing to the skin.

When the scrub is complete, be sure to apply it to wet or damp skin. The best time to do this is in the shower so that you can rinse it off after application. Apply the scrub directly to your skin and rub it in circular motions with your fingers, or use a washcloth or loofah. Remember the circular motion helps to distribute the caffeine to eliminate cellulite and varicose veins.

Friday, February 12, 2010

scrub and glow


Body scrub

The outermost layer of skin, the epidermis, accumulates dead skin cells that
need to be removed. Normal bathing does not provide the exfoliation that is
needed for the healthiest skin. Regular exfoliation with a body scrub will
remove the dead outer layer of your skin and reveal a younger, smoother, soft,
healthier layer of skin. Making u GLOW !!!
The antioxidants in coffee, cocoa, chocolate or wine
scrubs help to prevent the signs of aging skin. Scrubs may be used up to 2 or
3 times per week. Use at least once weekly to keep your skin healthy.

Search Engine Submission - AddMe


Scrub Facts:

1. Promote increased blood circulation

2. Fight cellulite (esp. scrubs with caffeine or coffee)

3.Open and cleanse pores

4. Remove dry itch and flakiness

5. Nourish and moisturize you skin

6, Can be used as a one-minute manicure or pedicure


How To Use: Apply a handful of scrub to damp skin before
showering or bathing. Massage in a circular motion, beginning with feet and
legs, and work your way up. Continue massaging to allow essential oils to
penetrate the skin. Turn on shower, bathe and rinse as usual.
CAUTION:
Scrubs may make the tub or shower slippery!

Despite the many benefits, be sure not to overuse body scrubs, which can damage or irritate healthy layers of skin and avoid areas of your skin which may have preexisting irritations such as rashes, wounds, or other ailments.

Friday, February 5, 2010

3 steps to radiant glow


easy steps to radiant glowing skin

Hello guys, this is a very personal - tested and proven procedure. I know your life style doesn’t give room for extensive beauty therapy . so i give u 3 easy steps to glowing radiant skin.

  • a. Cleanse: splash cold water on the face a refreshing -feel.

  • b. Towel steam: deep your face towel in warm water then dab the towel on your face.

  • c. Moisturise: rub in light moisturiser on your face. For an oily face which is prevalent in our country use an oil control cream not your normal face cream

This procedure is also very good for you if you’ve been out all night and your face shows it.

Tuesday, February 2, 2010

Eyeliners: easiest way to glam your eyes


Eyeliners when properly used give you a quick glamorous look.


There are different types of eyeliner:


Ø pencil eyeliner


Ø liquid eyeliner


Ø cake eyeliner


Ø gel eyeliner


But the real glamour comes when you use coloured eyeliners blue, green, purple, silver, gold, indigo, glitters and as many colour you can lay your hand on. The effect is unbelievable transformation.


Now the problem we have in Nigeria is abuse of this look, proper application is vital else you would lose the glamorous effect you are after.


Note the quote “less is more” that is rule of this game, if you choose to use blue liquid eyeliner on your lids then cool it with black pencil on the lower lids.


Never use contrasting sharp colours on the upper and lower lids at the same time.


Black is the acceptable colour, an all rounder. It can be used to complement any other colour.


Learn to draw slim lines first, you can layer and thicken till you get your desired size. It is very difficult to correct a mistake, so its better to be safe than sorry especially when using liquid and cake liner.


Glittery liquid eyeliners are divine when going out at night but are not appropriate for a day look to work.


Now that you have glamour at the tips of your pencil, maximise it but don’t overdo it .

Friday, January 1, 2010

make up bag inventry


Out with old & in wit new

It’s a new year everyone with resolutions, the need to make changes and upgrade personal life style is paramount. So we will take an inventory of your make up bag, I will guide you on what you should throw out and advice you on the in things.

  • · If your foundation is celebrating 1yr or more in your bag then it should GO.

Upgrade to a more natural look try tinted moisturiser or a mineral powder foundation.

  • · Mascara : once over 6 month old should GO.

upgrade to a waterproof mascara it’s the BEST

  • · Powder’s usually last long but 2yrs! Please let it GO.

Try the mineral loose or pressed powder; they are great for aging skin and divine on youthful ones.

  • · Lip glosses that smell bad says it all, GO.

Be adventurous, try purple, peach and even red(tomato or bloody)

  • · Change your eye shadow colours, you could exchange with friends. Just to spice up your look.

· Buy coloured eyeliners to brighten the eyes.

have fun experimenting